Friday, December 10, 2010

Display Variables Access Scope using timeline objects.

please like and post your questions : http://www.facebook.com/pages/FlashCS5-Tutorials/176320862386436

In AS2 it was very easy to access any variables from Parents and Childs using _parent or _root .

but after the enhancement that happened to the AS3 the change the way you can access variables from different scops using the timeline Movies or even thru a classes.

****access variables using time line Movies.

to understand how you can access a parent variables from child or vise-versa you need to create new AS3 document  and then create Circle Movie and name it "shapes_mc"  then inside this Movie Create another square  and Movie and name it "square_mc". so finally create a dynamic text name it "name_txt" then converted to movie and name it "textContainer_mc" as in the picture below:

so now on the stage create new variable in farm1 :
var Scope1 = "Scope1"
in the shapes_mc create another variables :
var Scope2 = "Scope2"
in the Square Movie create variable
var Scope3 = "Scope3"

* now I will show you how you can access these variables from different Movies by creating a buttons in each scope and in when the user click will trace the other variables from button scope.


  • Stage Button Code :

stage_btn.addEventListener(MouseEvent.MOUSE_DOWN,TraceScopeHandler)
function TraceScopeHandler(e)
{
trace("Stage Variable --> "  + Scope1)
trace("Shapes Variable --> " + shapes_mc.Scope2)
trace("square Variable --> " + shapes_mc.square_mc.Scope3)
trace("Text Variable --> " + textContainer_mc.name_txt.text)
}
  • shapes Button Code :
import flash.display.MovieClip;
var Scope2 = "Scope2"
shapes_btn.addEventListener(MouseEvent.MOUSE_DOWN,TraceScopeHandler)
function TraceScopeHandler(e)
{
var oStage:MovieClip = parent as MovieClip
trace("Stage Variable --> "  + oStage.Scope1)
trace("Shapes Variable --> " + Scope2)
trace("square Variable --> " + square_mc.Scope3)
trace("Text Variable --> " + oStage.textContainer_mc.name_txt.text)
}
  • square button code:
import flash.display.MovieClip;
square_btn.addEventListener(MouseEvent.MOUSE_DOWN,TraceScopeHandler)
function TraceScopeHandler(e)
{
var oShapes:MovieClip = parent as MovieClip
var oStage:MovieClip = oShapes.parent as MovieClip
 
trace("Stage Variable --> "  + oStage.Scope1)
trace("Shapes Variable --> " + oShapes.Scope2)
trace("square Variable --> " + Scope3)
trace("Text Variable --> " + oStage.textContainer_mc.name_txt.text)
}


----------------------------------

Source Code 

Wednesday, December 8, 2010

Create facebook Iframe Application Using flash AS3 API.

A new Updated tutorial have been added,please follow this link below .

http://as3flashcs5.blogspot.com/2011/04/create-facebook-iframe-application.html

please like and post your questions : http://www.facebook.com/pages/FlashCS5-Tutorials/176320862386436

After along research on how I can use flash instead of flex to create facebook application by using the new facebook graph API, I finally create a simple class to connect flash with facebook and i am happy to share it with you.

please be aware to follow below steps because any mistake may give you an error .

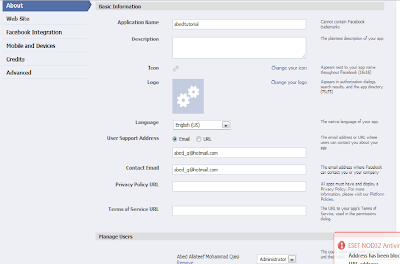
so as many of you know already know the first step is to create facebook new application from the developer application as you can see in the picture below :

  • when you click setup new application you need to choose your application name and agree the facebook terms ( I choose facetalk) .
  • after your application is created you must know the most important parameters in order to connect with facebook ( API key, application ID, application secret ) .
  • now click the setting and go to the website tap and fill the site url with your application folder URL so for me i fill it with : http://amazingwork.com/amazingtalk/ so i hosted my files inside amazingtalk folder and in the site-domain just fill it with your domain : amazingwork.com .
  • then click the facebook integration tap and now you need to fill the convas url and this is the main URL for your application and every body will access your application thru this URL so for our example I fill it with amazingtalk becuase facetalk is already taken, and in the convas Type please be sure to select Iframe because your application is not related to facebook compiler, u can use any java script , you are not forced to used FBL tags ). finally choose Auto-resize in the iframe size .
at this stage we finish creating our application setting ;) now we will start Writing our code to connect with facebook.

as i found in my research that facebook keep upgrading their code and release new versions of API to allow users to connect with the facebook, so in this tutorial we will connect with facebook using the graph API which the latest version of facebook API.

so since we will use Flash AS3 to connect with facebook you need for sure to install the graph API as3 libraries to connect with facebook, so please click this link below to download this graph API.


after you installed the graph ApI, go to flash cs5 and create new flash AS3, then go to file-->action script setting, then as you can find in the picture below click the + sign and choose the GraphAPI Web_1_0.swc as you can find in the .rar file .

now flash will recognize all the facebook classes .

P.S: if you need to create a desktop version please be aware to download the desktop version from google code :
this will help you to test your API in offline mode before converted to the web version.
also you can download the whole documentation from the google code aslo.

now to make it easy for u i have created simple single tone class that handle the connection with facebook thru flash itself also u can use a java script  to handle the connection :

you can find the code of this class in the source files link in the bottom of this tutorial, so to use this class you need only to copy and paste it in your .fla folder, and then from any place you need to use this class functionality you can write this code :

var oFaceBookConnector:FaceBookConnector = FaceBookConnector.GetFaceBook(Trace_txt);
oFaceBookConnector.APKey = "b1762000d69544ebef65396dfe4a297a"
oFaceBookConnector.APPID = "181390918539668"
oFaceBookConnector.ReDirectURL ="http://amazingwork.com/fbexampletest/index.html"
oFaceBookConnector.addEventListener("Connected",onFaceBookConnectHandler)
oFaceBookConnector.Connect()
function onFaceBookConnectHandler(e)
{
Trace_txt.text = "Connected"
UserID_txt.text = oFaceBookConnector.UserInfo.UserID
}


the Trace_txt is only for testing purpose and you can remove it when you finish your testing.
so as you can notice first of all i get the instant of the facebook object , then i set the importent properties i need to connect to facebook ( APkey, APPID, redirect URL - i use this url to set the permition for the first time user connect to my application)
also i created a custom event to know when my application successfully connected to the facebook .


after we publish the swf  then you need to establish the connection using facebook Javascript graph API, and this can happens using any server pages ( PHP,ASP.net) or even an HTML page .


so after you publish the SWF and HTML page you need to modify the HTML page to connect with facebook.


first of all copy this code in your header tag :
<script type="text/javascript" src="http://connect.facebook.net/en_US/all.js"></script>
<script type="text/javascript">
    function SetPermissions(ReDirectURL) { 
       top.location.href = ReDirectURL;
       
    }
</script>


in the  body tag and before your SWF object you need to reference to the facebook java script bridge :
<script type="text/javascript" src="FBJSBridge.js"></script>


so by this you finish all itis need to connect to facebook :)
----------------------------------------------------------------------
you can download all you need by follow this link below :


Source Files
Online Demo

if you have any question please feel free to contact me : abed_q@hotmail.com


Tuesday, December 7, 2010

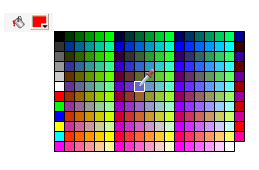
Create Solid Color Picker Class using flash AS3


in this tutorial you will learn how to create solid color picker from scratch using external class .
in order to complete this tutorial you need to understand the following :  

  • Mouse.hide(): Hide the Mouse cursor when rollover the color boxes because we will use custom cursor.
  • graphics: graphic object is a powerful classes to draw primitive shapes with different styles in any display object.
  • dispatchEvent(): we will create custom event dispatcher so we can know when the user select color box.
  • extends: if we have an external class and we need to use it as a display object then we need to extend it from a movieclip or a sprite classes.
  • transform.colorTransform: in order to change the color of any movie clip, you  need to use color transform to apply new colors.
  • mouseEnabled: some time we need to disable the mouse event on some object, and that is very helpful when you have nested movieclips and some of them are only used for graphics.
  • Sprite:a new amazing  type in AS3 when you want to create display object without need for a timeline classes. 

create new movie clip on the stage and name it PacketContainer_mc then inside this movie create another movie and name it SelectedColor_mc and we will use this movie to show the current selected color.

then in the first frame on the stage copy and paste below code :

PacketContainer_mc.addEventListener(MouseEvent.MOUSE_DOWN,ShowSolidColor)
function ShowSolidColor(e)
{
var oSolidColorPicker = new SolidColorPicker(PacketContainer_mc,EyeDropper_mc,10)
oSolidColorPicker.x =PacketContainer_mc.x + PacketContainer_mc.width
oSolidColorPicker.y = PacketContainer_mc.y+PacketContainer_mc.height
oSolidColorPicker.addEventListener("onColorSelected",onColorSelected)
addChild(oSolidColorPicker)
}
function onColorSelected(e)
{
var oColorTransform = PacketContainer_mc.SelectedColor_mc.transform.colorTransform;
oColorTransform.color = e.currentTarget.SelectedColor;
PacketContainer_mc.SelectedColor_mc.transform.colorTransform = oColorTransform;
}

as you can notice when the user click the packet container movie we create new instant of our color picker class and pass following parameters
  1.  PacketContainer_mc : some time you need to know which object refrence call this class.
  2. EyeDropper_mc : our new custom cursor, you can find it in the library.
  3. 10 : the size of each box in the color picker container matrix.
so when the user click any box in the matrix we fire up custom event and call the onColorSelected function where we apply the new color to the selected Color Movie .

before build color picker class you need to know that each color we represent by 6 hexa decimal 
characters and to build the huge number of boxes we need an easy way, so i found the most of the boxes colors are derived from the following numbers:

 ("00", "33", "66", "99", "CC", "FF");

so by having a combinations of the above number we can actually get  216 color for example 

003366,003399,0033cc,336699,...,....

and the rest of the boxes is a default color boxes like the black,red,green,....and these colors we need to pass it manually 000000,00ff00,ff0000 and they are only 12.

so now all we need is to draw these boxes and the deafulat color boxes, and add the rollover event listener on each box and draw an outline white boarder and show the custom cursor .

-----------------------------------------------------------------


please if you have any question about the code just contact me on abed_q@hotmail.com


Monday, December 6, 2010

Create Animated amazing Shapes using flash AS3

please like and post your questions : http://www.facebook.com/pages/FlashCS5-Tutorials/176320862386436


in this tutorial you will learn how to create amazing circular animated shapes as in the picture below :
we will use the following AS3 build in functions and properties :

  • stage.stageWidth : this property is allow you to get the width of the stage ( and itis really helpful when you need to center the object or on resize events.
  • stage.stageHeight : the same is stageWidth but we get the height of the stage instead of the width.
  • MouseEvent : in AS3 when you need to fire a press event you need to use MouseEvent.MOUSE_DOWN along with the event listener and pass the mouse event as parameter to the caller function, and this is really a cool enhancement because you can now know the firing event and even the target which fire this event by using  e.currentTarget.
  • Math.floor(Number): we use this when you want to get an integer value with the minimum value for example when you have a number with the range from 0.111 to .99999 the value will be always 0.
  • Math.random(): get a float number between 0 and 1 .
  • setInterval( function, delay ): we will use the set interval to create the animation effect because i can call the same function every time defined by the delay number counted by milli second.
  • clearInterval: when you want to stop calling this function.
  • rotation : when you want to rotate the object, but please be aware the the object rotate based on its orientation point.
  • gotoAndStop.
  • addChild(child) : you will use addChild maybe in every application because now in AS3 you deal with stage movies as an array of display objects and it os really an amazing enhancement because now you have a lot of build in function to deal with these display objects.  
  • container.removeChild(Child) : to remove a specific display object from the container and in our case from the stage.
  • getChildByName(name): return a child using itis name.
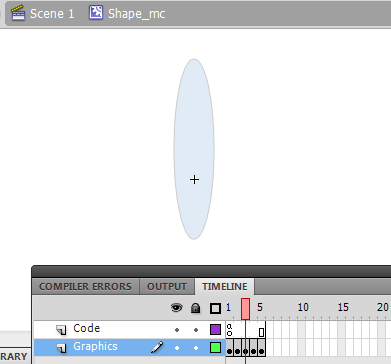
so you need to start by create new as3 document, and then create new movie clip and name it Shape_mc and in this movie clip you need to create two layers, the first one will contain only a stop action and the over will contains several frames and in each frame you will draw a simple shape as you like .


then you can remove the Shape_mc from the stage and linkage it to be used by action script at run time, then return to stage and add a new button from the component panel and then select the first firm in the stage to write the main code :


import flash.display.MovieClip;
import flash.events.MouseEvent;

var nStaticAngleMargin:int = 5
var nContainerXpos:Number = stage.stageWidth / 2
var nContainerYpos:Number = stage.stageHeight / 2 + 25
var nCallerDelay:int= 100
var nMaxAngle:int = 360;
var Container_mc:MovieClip;
var nShapeInterval;
var nAngleMargin:int =  0;
var nFrameNumber:int = 1;

function ReDrawNewShape(e:MouseEvent)
{
if(getChildByName("Container_mc")!=null)
removeChild(getChildByName("Container_mc"))
Container_mc = new MovieClip()
Container_mc.name = "Container_mc"
Container_mc.x = nContainerXpos
Container_mc.y = nContainerYpos
nFrameNumber =Math.floor(Math.random()*100%5)+1
addChild(Container_mc)
clearInterval(nShapeInterval)
nAngleMargin = 0
nShapeInterval = setInterval(DrawShape,nCallerDelay)
}

function DrawShape()
{
if(nAngleMargin>nMaxAngle)
{
clearInterval(nShapeInterval)
}
else
{
var oShape_mc = new Shape_mc()
oShape_mc.rotation = nAngleMargin
nAngleMargin += nStaticAngleMargin
oShape_mc.gotoAndStop(nFrameNumber)
Container_mc.addChild(oShape_mc)
}
}

Play_btn.addEventListener(MouseEvent.MOUSE_DOWN,ReDrawNewShape)

------------------------------
Online Demo
Source files

for further questions please contact me on : abed_q@hotmail.com.


Sunday, December 5, 2010

Create Grid view Using AS3 By Abed Allateef Qaisi

please like and post your questions : http://www.facebook.com/pages/FlashCS5-Tutorials/176320862386436

any developer can face many times a need to view a content in multiple raws and columns and he always ends with a huge bunch of codes ;)

in this tutorial you will learn how easily you can build a a grid view for your puzzle game using a light amount of codes.


first of all for any Grid view we need to know how many columns and raws we need to view and also the width, and height margins between the contents objects.

so create new flash file with AS3, then go to the first frame in your document or use the document class and define the following variables as we mention above:

var nNumberOfColumns:int  = 4;
var nNumberOfRows:int = 4;
var nHorizontalMargine:Number = 20; // in pixels
var nVerticalMargine:Number = 20;
var nContainerXpos:Number=0;
var nContainerYpos:Number=0;

after you defined the main variables, go to flash and create Block Movie Clip and name it Block_mc and create a dynamic text box and name it txtBlockNumber, after that we need to linkage the block movie by check the export for actionscript as you can notice in below image.


so now all we need is to write the main code, the trick is simple we need to use math signs ( %  ,  / ) to control the grid view, the % control the number of columns and / control the number of raws.

The main code :


import flash.display.Sprite;
import flash.display.MovieClip;

var nNumberOfColumns:int = 4;
var nNumberOfRows:int = 4;
var nHorizontalMargine:Number = 10;
var nVerticalMargine:Number = 10;
var nContainerXpos:Number=0;
var nContainerYpos:Number=0;


var Container_mc:Sprite = new Sprite()
Container_mc.x=nContainerXpos
Container_mc.y=nContainerYpos
addChild(Container_mc)

var nPuzzleBlocks:int = nNumberOfColumns*nNumberOfRows
for( var i = 0; i < nPuzzleBlocks ; i++)
{
var oBlock_mc:MovieClip = new Block_mc()
oBlock_mc.txtBlockNumber.text = i+1 ;
oBlock_mc.x = (i % nNumberOfColumns ) * (oBlock_mc.height + nHorizontalMargine)
oBlock_mc.y = Math.floor(i / nNumberOfColumns ) * (oBlock_mc.width + nVerticalMargine)
Container_mc.addChild(oBlock_mc)
}

------------------------------------
Source Code

for further question just contact me on abed_q@hotmail.com

Create facebook Iframe Application Using flash AS3 API ( Updated Version ).

please like and post your questions :  http://www.facebook.com/pages/FlashCS5-Tutorials/176320862386436 After I have received a lot of requ...